How to Edit Your Website's Navigation Menu
What You’ll Learn
How to edit your website’s navigation menu using Morweb’s front end and back end editing tools.
Why It Matters
Your navigation menu guides visitors to key pages on your site. Keeping it updated and organized improves usability and helps users find content efficiently.
Step-by-Step Instructions
1. Front End Editing
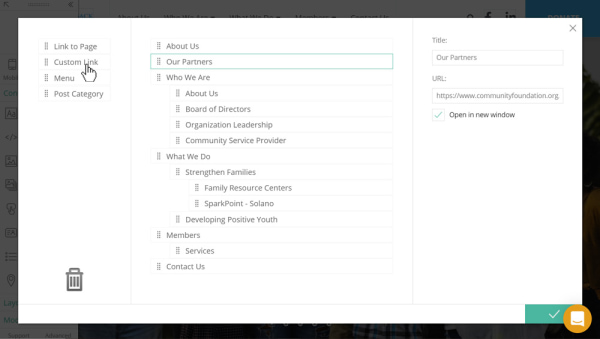
- Hover over the site’s navigation menu and click the edit icon in the upper-left corner.

- To add an internal page:
- Drag the Link to Page item into the menu.
- Select a page from the dropdown menu.
- Optionally enter a Custom Title.
- To nest items as subpages, drag slightly below and to the right of the parent item.
- Click Apply.

- To link to an external website:
- Drag a Custom Link into the menu.
- Enter a title for the item.
- Paste the full URL (e.g., https://example.com).
- Select Open in a new tab.
- Click Apply.
- To link to a PDF:
- Upload the PDF to your media gallery and note the file name.
- Drag a Custom Link into the menu.
- Enter a title for the item.
- Set the URL as
/files/galleries/your_file_name.pdf. - Select Open in a new window.
- Click Apply.
2. Back End Editing
- Log in to your Morweb admin dashboard.
- From the top navigation, go to Site > Menus.
- Select the menu you want to edit or click Add Menu to create a new one.
- Use the drag-and-drop interface to reorder or nest items as needed.
- Click Apply to save your changes.

Troubleshooting Tips
- Menu changes not showing?
Refresh the page or clear your browser cache to see the updated menu.
- PDF link isn’t working?
Make sure the file path starts with
/files/galleries/and that the file name is exact, including capitalization and extension. - Custom title not saving?
Click Apply after typing your custom title to ensure it’s saved.
- Can’t see the edit icon?
Verify that you are logged in and have permission to edit the site.