How to Change Heading Styles
What You’ll Learn
You’ll learn how to format text as styled headings (H1–H6) and adjust font sizes using Morweb’s visual editing tools.
Why It Matters
Using proper heading styles enhances readability, accessibility, and SEO. Structured headings make it easier for visitors to scan content and keep your website visually consistent with your brand.
Step-by-Step Instructions
1. Option 1: Edit with the Text Editor
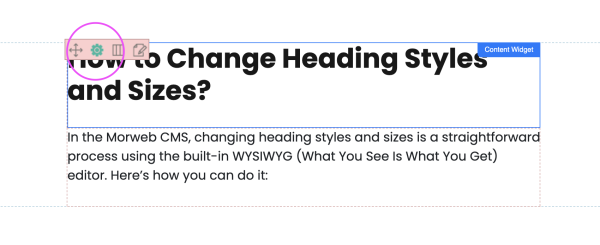
1. Open the Text Editor
- Hover over the upper left corner of the content area.
- Click the gear icon to open the Text Editor window.
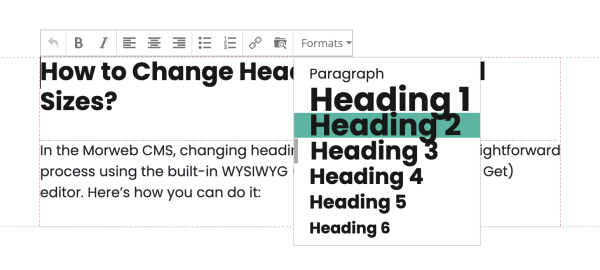
2. Change a Heading Style
- In the toolbar, find the format dropdown (it usually shows “Paragraph” by default).
- Select a heading level:
- Heading 1 (H1): Main page title (use once per page)
- Heading 2 (H2): Section titles
- Heading 3–6 (H3–H6): Subsection titles

3. Save Your Changes
- Click the green checkmark to apply the changes.
4. Option 2: Edit with the Morweb Live Editor
1. Open the Live Editor
- In the text area, right-click to bring up the editor menu.
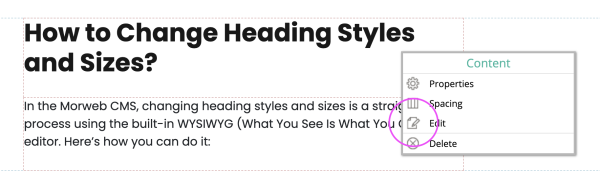
2. Edit the Heading
- Click the Edit button (pencil icon).
- Use the Heading dropdown to select your desired style (H1–H6).
- Click outside the menu to apply changes.
Troubleshooting Tips
- Can’t Find the Heading Dropdown
The toolbar might be hidden. Click inside the text block to make it appear.
- Inconsistent Font Sizes
For consistency across pages, use predefined styles instead of custom inline styles.